This is an old revision of the document!
App 1.x: User interface, Views, Elements, Follow mode, Crosshairs, Screenshot, Overview
App Version 1.14.17
The information in this description refers to the mentioned version. More recent versions of the app may differ from this description. Nevertheless, the information described here should help to make it easier to use even more recent apps. The information is without guarantee.
Next topic: App: Map, POIs, Bookmarks, Address, Coordinates
Operating guide for the apps Kurviger (Free) and Kurviger Pro
The apps Kurviger (Free) and Kurviger Pro are great tools to create routes, to load, save, display and share routes with friends. You can also explore areas with or without a route in follow mode.
With Kurviger Pro you have more possibilities (see below).
The apps can be adjusted very flexibly to the device and the needs of the user.
In order to use the apps and the advantages of their settings without any problems, you should take a little time to get familiar with them. To get to know the apps and as a guide, this Operating guide is available for you.
This Operating guide is divided into topic blocks. In addition to this topic block there are the following topic blocks:
- Map, POIs, Bookmarks, Address, Coordinates
- Route planning, Routing, Route, Instructions, Overlays, Track, Transfer, Waypoints
- Kurviger Pro: Navigation, Auto-Zoom, Simulation, GPS Logging, Screen Lock, Rerouting, More, Offline use
To learn how to use the app, it is recommended to read for Kurviger (Free) this topic block as well as the topic blocks without Kurviger Pro annotation, for Kurviger Pro additionally the topic block marked with “Kurviger Pro” if necessary.
Links to these topics of the Operating guide and further information about the Kurviger App can be found throughout this topic or at the end of the page.
The links to the respective topics are preferably grouped at the end of the page in order to avoid interrupting the description of individual facts and thus the flow of reading as much as possible. The additional info can then be reached in case of knowledge gaps under the given links.
It is recommended to read the blocks given above, then most of the link jumps will be unnecessary. In addition, problems with the app can be avoided and save trouble and inquiries in the forum.
In order to be able to read the guide like a book, links to the previous and / or next topic block are inserted at the beginning and at the end of the topic blocks.
The operation with the basic elements is described. Experienced users can partly deviate from this due to the flexibility of the app.
To get to know the app is recommended:
- Internet connection should / must be available.
- First read the “Getting started” guide (Link at the end of the page).
- While reading this guide, practice with the app.
And now enjoy reading the docu and using the Kurviger App.
Settings of the Kurviger App
The Kurviger App allows a lot of setting options in menus and dialogs.
- This allows the app to be adapted to the device and the user's needs.
- This makes the app very popular with experienced users.
- A beginner may feel overwhelmed by the setting options at first. Therefore we recommend:
- After installation, do not change any settings until you are familiar with the basic operation of the app, following the instructions in the documentation.
- It is advisable not to try to use all the possibilities at first.
- Only then adapt the app to your needs step by step by changing the settings.
- In order to be able to use the app to its full extent, a certain learning process and practice is quite helpful.
- Gain first experiences possibly for and / or during short trips or after-work rounds.
- With a certain experience larger routes are possible with a lot of driving fun.
For support you can use this guide and other descriptions in this Wiki. Additional you can use the forum for more information.
The menus and dialogs for the app's settings are revised and supplemented from time to time. It is tried to incorporate the changes in this documentation. However, it may happen that the app is more up-to-date than the documentation.
Modify settings:
In the app you can access the settings as follows:
Menu Button>Settings>
You don't know what is meant and / or where the menu button is? No problem, just read on.
The above notation means: Touch the Menu button to open the main menu. Touch the Settings selection in the main menu to open the settings menu. There you can make further selections and finally change settings.
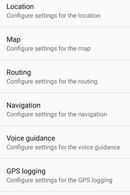
Different settings are possible for the following groups:
- Location
- Map
- Routing
- Navigation (only in PRO)
- Voice guidance (only in PRO)
- GPS logging (only in PRO)
- Application
Tapping the desired group opens the associated menu for selecting the various settings. Make the desired setting there.
More options for settings in Kurviger Pro:
In Kurviger Pro you can also reset the settings to their original state. In Kurviger Pro they can also be saved and reloaded. See at “Kurviger Pro: Navigation, …, more, …” by “Additional topics of the operating guide”, Link at the end of the page.
Interface, actions and settings for Kurviger (Free) and Kurviger Pro:
The following is described,
- what the app's interface looks like,
- where you find e.g. the menu button and more,
- how the app is operated in general and using the settings.
Interface of the Kurviger App
This section describes the app's user interface (appearance and elements) as well as some explanations of the operation and settings of the app Kurviger Pro. The Kurviger (Free) app has not so much functions than the Kurviger Pro app. Therefore some things are described here that are not available in the FREE version.
If the definitions or meanings of terms in Kurviger are not known, it is helpful to read them first.
See Links at the end of the page.
If you are patient, please read on to get to know the Kurviger App. For the very impatient, there is the “Getting Started” guide (Link at the end of the page). With it you can quickly gain first experiences with the Kurviger App (Free or Pro). If you have any questions, you are welcome to read on here to get to know the Kurviger App and its operation a bit better.
Views and Modes of the Kurviger App
In the app there are different views and operating states. The individual views and states are called modes. The main modes are the main views Map Mode, Follow Mode and Navigation Mode. Additionally, there is the Navigation Simulation Mode.
Navigation Mode and Navigation Simulation Mode are available only in Kurviger Pro.
In the main modes, there are possible further modes for operation and/or calculation. Here you can learn something about them.
Main Views or Main Modes
There are several ways to use the app:
| Map View, Map Mode, Create Route Mode, Planning Mode: | ||
|---|---|---|
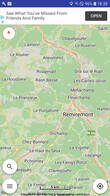 | 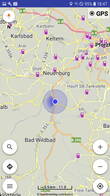 | (Pictures are only rough examples. Depending on settings, view may differ significantly.) |
| Location detection of the device switched ON or OFF. | ||
| The map view is the basis for route planning as well as the follow, navigation and navigation simulation view. | ||
| In this mode you can plan, import (load), export (save) routes. | ||
| The map can be moved or rotated manually (see “Gestures”, Links at the end of the page), but always stays in the same position until further manual movement. | ||
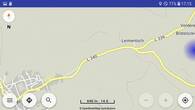 | When the location detection is switched on, the location display may be outside the visible range (e.g. while driving). Therefore, while driving, this mode should not be used, but the Follow Mode (or in Kurviger Pro the Navi Mode). Follow Mode and Navi Mode see below. | |
| In the view of Kurviger (Free) there is an advertising area at the top and the navigation button is not shown. | ||
| Pictures: Above left: Portrait Kurviger (Free) without location. Above right: Portrait Kurviger Pro with location. Below: Landscape Kurviger Pro with location at the right edge outside the visible area. | ||
| Follow View, Follow Mode: Follow the location. | ||
|---|---|---|
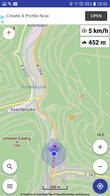 | 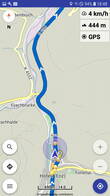 | (Pictures are only rough examples. Depending on settings, view may differ significantly.) |
| Location detection of the device must be switched on. | ||
| In this mode the map is automatically moved so that your position and direction of movement is visible. The map follows the location. | ||
| If you move the map manually, it will automatically be repositioned after a short time so that the location is within the visible area. | ||
| In this mode you can see where you are while driving. The course of the road and possible turns are displayed. You can explore an area without using a predefined route. | ||
| If a route or track is displayed, you can follow its path without instructions or guidance. | ||
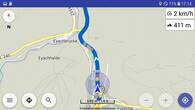 | Altitude and speed can be displayed. | |
| In the view of Kurviger (Free) there is an advertising area at the top, the navigation button is not shown. | ||
| Location button is marked in color. | ||
| Pictures: Above left: Portrait Kurviger (Free) without route. Above right: Portrait Kurviger Pro with route. Below: Landscape Kurviger Pro with route. | ||
Switching on the Follow view: Long touch the Location Button, Short form: Location Button (Long). |
||
Switching off the Follow view: Tap the Location Button, Short form: Location Button (Short). |
||
| More see below and at “Additional topics of the operating guide” (Links at the end of the page). | ||
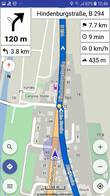
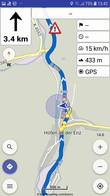
| Navigation view, navigation mode (only in Kurviger Pro): Follow the location with guidance along a route | ||
|---|---|---|
 |  | (Pictures are only rough examples. Depending on settings, view may differ significantly.) |
| Location detection of the device must be switched on. Route must be available. | ||
| In this mode the map is automatically moved so that your position and direction of movement is visible. The map follows the location. In addition, you will be guided along the existing route. | ||
| For this purpose, various display panels (areas) are shown for navigation; depending on the settings, voice guidance is also possible. | ||
| The distance and time to the destination or next via point are displayed. | ||
| Altitude and speed can be displayed. | ||
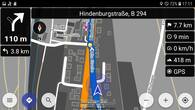 | If you deviate from the route, a corresponding message is displayed and, depending on the settings, the route is recalculated. | |
| Navigation button is marked in color. | ||
| Pictures: Above left: Portrait,on the route. Above right: Portrait, off the route, white Panel, Map color normal. Below: Landscape, on the route, Panel black, Map color dark. | ||
The settings at Menu Button > Settings > Navigation > Navigation mode > must be setted to Normal. |
||
Switching on the Navi view: Tap the Navigation Button, Short form: Navigation Button (Short). |
||
Pause and Continue the Navigation: Tap the Navigation Button, Short form: Navigation Button (Short). |
||
Switching off the Navi view: Long touch the Navigation Button, Short form: Navigation Button (Long). |
||
| More see “Additional topics of the operating guide” (Links at the end of the page). | ||
| Navi simulation mode (only Kurviger Pro): Simulating the guidance along a route. | ||
|---|---|---|
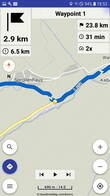 | 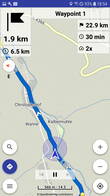 | (Pictures are only rough examples. Depending on settings, view may differ significantly.) |
| Location detection of the device switched ON or OFF. Route must be available. | ||
| In this mode navigation is simulated. | ||
| A fictitious location display is guided along the route. The turn-by-turn instructions are displayed. | ||
| If voice guidance is switched on, the turn-by-turn instructions are also given acoustically according to the settings. | ||
| The simulation speed can be specified as a multiple of the speeds of the route sections considered in the route calculation. | ||
| It is also possible to jump forth and back. | ||
| Graphics and function of the simulation play panels were modified from version 1.11 to version 1.13, further modifications are possible. | ||
| Pictures: Left: Simulation not started or paused. Right: Simulation running. | ||
The settings at Menu Button > Settings > Navigation > Navigation mode > must be setted to Simulation. |
||
Switching on the Navi simulation: Tap the Navigation Button, Short form: Navigation Button (Short). |
||
Switching off the Navi simulation: Tap the Navigation Button, Short form: Navigation Button (Short). |
||
Move along the Route with Navi Simulation Play panels. |
||
| More see “Additional topics of the operating guide” (Links at the end of the page). | ||
Operating and editing modes
In addition to the main or view modes there are other modes in the app. These modes can be switched on and off e.g. with buttons or in the settings. They can be used in reasonable combination with the main modes. These modes are listed here as additional information, because in the forum from time to time a corresponding mode can be pointed out. So don't get confused.
Here is a list of various operating or editing modes (see below for additional information):
- Light or Dark mode: Light, Dark for better readability of menus, dialogs and lists depending on ambient light or user preference.
- Menu and dialog mode: A menu or dialog is displayed. Actions can be started or settings can be made.
- Measuring mode: It is possible to measure the distance between two points with a measuring line (see below).
- GPS logging mode (only Kurviger Pro): Traveled paths (tracks) can be recorded. When the mode is switched on, a panel is displayed in the upper right corner to switch recording on and off (and more).
Controls and actions of the Kurviger App
The app contains elements (e.g. button, map, menus, dialogs) with which you can operate it. This description shows you where the elements are, what they look like and what you can do with them.
Elements in the main modes
| Explanation to the descriptions in the following tables: | |||
| (optional) | The corresponding element is displayed permanently, temporarily or not, depending on the setting and / or input. | ||
| Bold elements | These elements can be used to trigger actions. | ||
| For more info on the elements and their actions, see also in this and in the other topics of the guide, Links at the end of the page | |||
| Screenshots: Samsung A3 (2017), 4,7 Zoll, 720×1280, Android 8.0, Kurviger Pro 1.11 to 1.14 | |||
Map mode and Follow mode
| Map mode, Planning mode: | |||
|---|---|---|---|
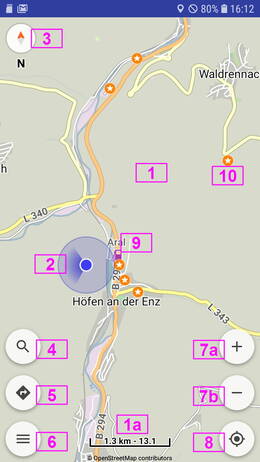 | 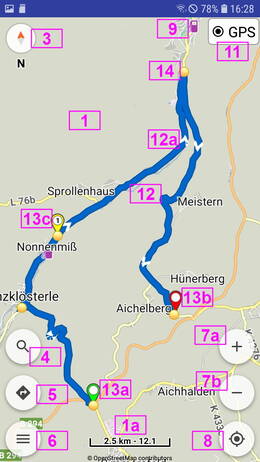 |
||
| Pictures: Left: No route, with POI. GPS Logging Panel is not visible. Right: With Route. GPS Logging Panel is visible (optional) (only in Kurviger Pro). | |||
| Elements in Map mode (possibly without location and / or route) | |||
| 1) Map | 1a) Scale (and depending on the setting zoom level) | 2) Location | 3) Compass (optional) |
| 4) Address Lookup Button (optional) | 5) Navigation Button (optional) (only in Kurviger Pro) | 6) Menu Button (optional) | . |
| 7a) +Zoom Button (optional) (and depending on the setting zoom level) | 7b) -Zoom Button (optional) | 7a,b) are only visible for a short time after touching the map | 8) Location Button (optional) |
| 9) POI (map levels, optional) | 10) Bookmark (optional) | 11) GPS Logging Panel (optional) (only Kurviger Pro) | . |
| 12) Route | 12a) Route Direction (optional) | 13a,b,c,d) Waypoints | 14) Instruction point (optional) |
| 13a) Waypoint Start | 13b) Waypoint End | 13c) Waypoint Via point (optional) | 13d) Waypoint Shaping point (optional), without fig. |
| For more info on the elements and their actions, see also in this and in the other topics of the guide, Links at the end of the page | |||
| Follow mode: | |||
|---|---|---|---|
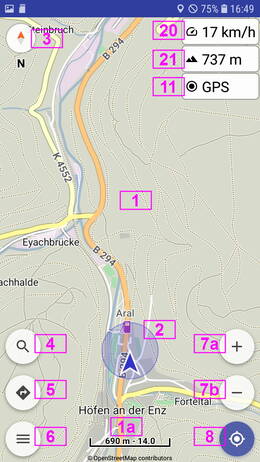 | 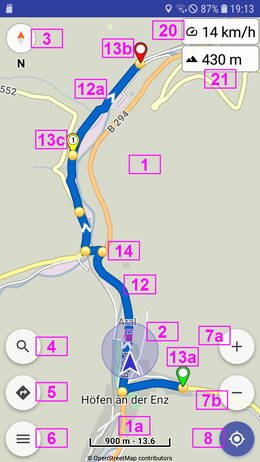 |
||
| Pictures: Left: Without route. Right: With route | |||
| Elements in Follow mode (possibly without route): | |||
| 1) Map | 1a) Scale (and depending on the setting zoom level) | 2) Location | 3) Compass (optional) |
| 4) Address Lookup Button (optional) | 5) Navigation Button (optional) (only in Kurviger Pro) | 6) Menu Button (optional) | . |
| 7a) +Zoom Button (optional) (and depending on the setting zoom level) | 7b) -Zoom Button (optional) | 7a,b) are only visible for a short time after touching the map | 8) Location Button (optional) |
| 12) Route | 12a) Route Direction (optional) | 13a,b,c,d) Waypoints | 14) Instruction point (optional) |
| 13a) Waypoint Start | 13b) Waypoint End | 13c) Waypoint Via point (optional) | 13d) Waypoint Shaping point (optional), without fig. |
| 20) Speed Panel (optional) | 21) Altitude Panel (optional) | 11) GPS Logging Panel (optional) (only Kurviger Pro) | . |
| For more info on the elements and their actions, see also in this and in the other topics of the guide, Links at the end of the page | |||
Navigation mode and Navi simulation mode
| Navigation mode (only Kurviger Pro): | |||
|---|---|---|---|
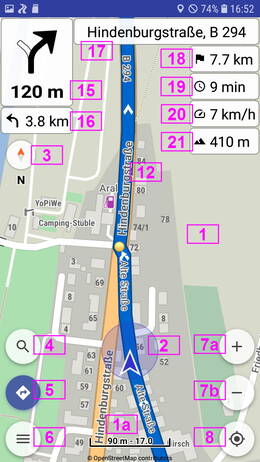 | 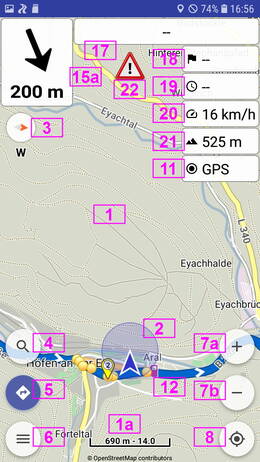 |
||
| Pictures: Left: On route Right: Off route | |||
| Elements in Navigation mode: | |||
| 1) Map | 1a) Scale (and depending on the setting zoom level) | 2) Location | 3) Compass (optional) |
| 4) Address Lookup Button (optional) | 5) Navigation Button (optional) (only in Kurviger Pro) | 6) Menu Button (optional) | . |
| 7a) +Zoom Button (optional) (and depending on the setting zoom level) | 7b) -Zoom Button (optional) | 7a,b) are only visible for a short time after touching the map | 8) Location Button (optional) |
| 12) Route | 15) Direction and Distance Panel | 15a) Direction and Distance Panel (bee line) for route continuation | 16) Preview Direction and Distance Panel |
| 17) Instruction Panel (optional, shows e.g. next street or waypoint name) | 18) Distance Panel | 19) Time Panel | 11) GPS Logging Panel (optional) (only Kurviger Pro) |
| 20) Speed Panel (optional) | 21) Altitude Panel (optional) | 22) Off route-Symbol | . |
| For panels 11, 15 to 21 you can set color, transparency and font size. | |||
| For more info on the elements and their actions, see also in this and in the other topics of the guide, Links at the end of the page | |||
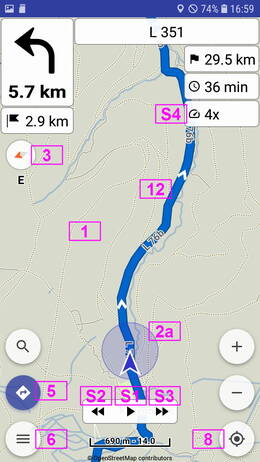
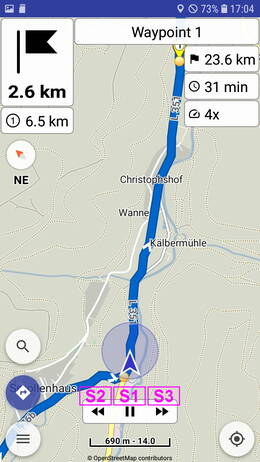
| Navi Simulation Mode (only Kurviger Pro): | |||
|---|---|---|---|
 |  |
||
| Pictures: Left: Stopped (Paused) Right: Running (Screenshots: Kurviger Pro 1.11.10, graphics from S2 and S3 may be modified at newer versions) | |||
| Elements S1 - S4 (Simulation-Play-Panel) are only available in Navi Simulation Mode: | |||
| 1) Map | 2a) virtual location | 12) Route | . |
| 3) Compass | 5) Navigation button | 6) Menu button (optional) | 8) Location button (optional) |
| S1) Start / Stop Simulation | S2) To previous instruction point (Short) | S3) To next instruction point (Short) | S4) Factor for speed of simulation run |
| S2) Back to the start (Long) | S3) Forward to the end (Long) | ||
| For more info on the elements and their actions, see also in this and in the other topics of the guide, Links at the end of the page | |||
Trigger actions with the elements in the main modes
In Kuviger (Free) and Kurviger Pro
ATTENTION!
Operation with gloves requires special gloves and increased care!
For safety reasons and to avoid incorrect operation, operate the app only at safe stopping points!
Only in Kurviger Pro
ATTENTION!
Operation with gloves requires special gloves and increased care!
For safety reasons and to avoid incorrect operation, operate the app only at safe stopping points!
Menu, dialog and list view and their tasks
The overview of the elements in the main views and their actions shows that you often open menus or dialogs from the interface. Also the bookmark, waypoint and turnpoint lists.
 | Some of the lists contain a toolbar. Depending on the list and the toolbar it contains different icons. When tapping on the icons, an action is triggered. |
 |
Screen orientation, Fullscreen, Font size, Display size and color
The app offers the possibility e.g. to set the screen orientation and font size quite flexible. For example, you can use portrait format for the menus and dialogs, but landscape format for the tour in follow or navigation mode. There are many different setting options. An automatic change from portrait to landscape format or vice versa can be avoided. This way the app can be adapted to the owner's wishes.
There is a possibility of a fullscreen display.
The font size of the map as well as the menus and dialogs can be set separately.
The display size of symbols and panels can be partially adjusted.
Screen orientation:
For adjusting the screen orientation 2 dialogs are to consider.
Dialog to select the Screen orientation:
For the Kurviger Apps you can select the screen orientation:
Menu Button>Settings>Application>Screen orientation>
Dialog will be opened. Select the desired “Screen orientation” for the app.
You can select from:
- System
- Portrait
- Landscape
- Reverse portrait
- Reverse landscape
- Sensor
Once selected, the setting of “Screen orientation” is taken into account for the modes specified in the “Screen orientation mode”.
Dialog to select when the selected Screen orientation is used:
For the Kurviger Apps you can select when the screen orientation you have selected should be considered:
Menu Button>Settings>Application>Screen orientation mode>
Dialog will be opened. Select the desired mode.
You can select from:
- Always
- Navigation / Follow (in Kurviger Pro)
- Follow (in Kurviger (Free))
- Off
Once selected, the setting of “Screen orientation” is taken into account for the modes specified in the “Screen orientation mode”.
Fullscreen:
The app can be displayed in full screen mode. The Android displays such as battery status, time, etc. are then hidden.
You can select the full screen mode with:
Menu button>Settings>Application>Fullscreen mode>
Note:
To keep the app simple, there are no plans to show parts of these Android displays in the app.
Full screen mode is intended for very small screens.
In Full screen mode e.g. by mount clips or similar operation of the app can be hindered.
Font size:
Font size for the map labels:
- The font size setting affects the font size in the map.
- The font size can be set in % of the standard font size:
Menu Button>Settings>Map>Font size>
- Dialog will be opened. Set the desired font size and confirm with OK.
Font size for menus, dialogs and display panel:
- The font size setting affects the font size in menus, dialogs and display panels. The app may have to be restarted.
- The font size can be set in % of the standard font size:
Menu Button>Settings>Application>Font size (restart)>
- Dialog will be opened. Set the desired font size and confirm with OK.
- Change only takes effect after restarting the app.
Symbols size:
The display size of some symbols on the map (e.g. fuel stations) can be adjusted.
Set the display size of the symbols with:
Menu button>Settings>Map>Display size>
Dialog opens. Select the desired size and confirm with OK.
Panels size and color:
The size of the display panel is automatically adjusted with its font size.
- The font size can be set in % of the default font size:
Menu button>Settings>Application>Font size (restart)>
- Dialog opens. Set the desired font size and confirm with OK.
- Change only takes effect after restarting the app.
The color of the display panel can be selected in Kurviger Pro.
- The display color can be selected:
Menu button>Settings>Application>Display color>
- Dialog opens. Select the desired color and confirm with OK.
App theme of menus and dialogs (Light/Dark):
The App theme of menus and dialogs may be selected:
Menu button>Settings>Application>App theme (restart)>
Dialog opens. Select the desired App theme and confirm with OK.
Change only takes effect after restarting the app.
Show map scale and zoom level, Units
You can, for example, use the zoom button to more or less zoom into or out of the map. The map scale and the value of the zoom level can be made visible.
In Kurviger Pro there is an auto zoom function for the Follow and Navi mode.
Depending on the zoom level, for example more or less streets, POIs, details are displayed or not. At high zoom level more details are displayed than at low zoom level. +Zoom increases, -Zoom decreases the zoom level.
Display of map scale and zoom level
You can select display of map scale and zoom level with the map scale setting:
Menu Button>Settings>Map>Map scale>
Selectable is:
- Normal (Shows map scale, shows zoom level at zoom buttons)
- Advanced (Shows scale and zoom level in extended map scale)
- Off (Does not show map scale, shows zoom level at zoom button)
Info to Kurviger Pro see according descriptions in the PRO topic at “Additional topics of the operating guide” (Links at the end of the page).
Units
In the app you can select the units of length, height and speed:
Menu button>Settings>Application>Units>
A dialog opens:
- Title: Units
- o Metric (m, km, km/h)
- o Imperial ((ft, mi, mph)
- CANCEL
The selected setting is used for displaying the length, altitude and speed.
Show elements permanently or briefly
Depending on the user's preference, some controls can be displayed permanently, briefly or not at all.
Here is a description of the display options using the example of Kurviger Pro in Follow and Navigation mode:
| Elements that can be shown or hidden (map (1) and location (2) cannot be hidden) | |||
|---|---|---|---|
| Follow mode | Navi mode | ||
 |  |
||
| Elements (optional visible) | |||
| All modes: | |||
| (1a) Map scale | (3) Compass | . | . |
| (4) Address lookup button | (5) Navigation button (only PRO) | (6) Menu button | . |
| (7a) +Zoom button | (7b) -Zoom button | (7a,b) are only visible for a short time after touching the map | (8) Location button |
| (9) POI (optional in PRO) | (10) Bookmark | (11) GPS logging-Panel (only PRO) | . |
| In Follow and Navi mode: | |||
| (20) Speed panel | (21) Altitude panel | . | . |
| In Navi mode: (only PRO) | |||
| (15) Direction and distance panel | (16) Preview panel Direction and distance | (17) Instruction panel (Turn instruction) | . |
| (18) Distance panel | (19) Time panel | . | . |
| For more info on the elements and their actions, see also in this and in the other topics of the guide, Links at the end of the page | |||
Showing the Compass:
- The Compass (3) is displayed permanently or optionally hidden and displayed for a short time after briefly touching the map.
Menu button>Settings>Map>Hide compass [x]
Showing the Operation buttons:
- The Zoom buttons (7a, 7b) are always displayed for a short time after briefly touching the map.
Map (Short)>
- The buttons Address lookup (4), Navigation (5), Menu (6), Location (8) are displayed permanently or optionally hidden and displayed for a short time after briefly touching the map.
Menu button>Settings>Application>Hide Screen buttons [x]
Showing bookmarks:
Menu button>Settings>Map>Bookmarks [x]- (For more info about bookmarks see related topic, link at the end of the page)
Showing Speed and / or Altitude panel in Follow and / or Navi mode:
- In Follow and / or Navi mode the Speed of the location may be displayed:
Menu button>Settings>Location>Show speed [x]
- In Follow and / or Navi mode the Altitude of the location may be displayed:
Menu button>Settings>Location>Show altitude [x]
PRO: Showing selectable POIs (Map layers):
- Pois (interesting places, e.g. fuel stations) may be selected at the map layers (only in PRO):
Menu button>Map>Map layers>
- Dialog opens. Select the desired option(s) and confirm with OK.
- (For more info about POIs see related topic, link at the end of the page)
PRO: Showing the GPS logging panel and / or of a logged track:
- On the one hand, the GPS logging panel can be displayed:
Menu button>Settings>GPS logging>GPS logging [x]
- On the other hand, a recorded track can be displayed on the map:
Menu button>Settings>GPS logging>Map [x]
PRO: Showing the Navigation panels:
- The Direction and distance (15), Preview (16), Distance (18) and Time (19) panels are always displayed during navigation.
- The panel Instruction (17) may optionally be displayed:
Menu button>Settings>Navigation>Show turn instruction [x]
Using Crosshairs
E.g. for setting and moving waypoints and bookmarks automaticly a crosshairs tool is displayed. This enables exact positioning (see below).
The position of the corresponding point is only accepted and the selected action executed when it is confirmed in the tool.
Note for users with update from version 1.13 and earlier:
In the past, there was a so-called bubble mode for setting and moving points. This is no longer available.
Why is the bubble mode no longer available? The position could not be positioned exactly depending on the zoom level. This sometimes led to unwanted effects,e.g. irritating route course and turn instructions. More precise positioning is possible with the crosshairs. In addition, additional actions for waypoints are selectable and the maintenance of the app is more maintenance-friendly.
Elements in Crosshairs tool and associated actions
Using Follow mode
In the Kurviger App (Free and Pro) there is the so-called follow mode or follow location mode. In this mode, access to the location must be enabled in the device. A route is not required, but may be available. The map is moved on the screen so that the location is automatically displayed in the visible area.
ATTENTION!
Operation with gloves requires special gloves and increased care!
For safety reasons and to avoid incorrect operation, operate the app only at safe stopping points!
| Follow mode, Follow view: | |||
|---|---|---|---|
 |  |
||
| Pictures: Left: Without route. Right: With route | |||
| Elements in Follow mode (possibly without route): | |||
| 1) Map | 1a) Scale (and depending on the setting zoom level) | 2) Location | 3) Compass (optional) |
| 4) Address Lookup Button (optional) | 5) Navigation Button (optional) (only in Kurviger Pro) | 6) Menu Button (optional) | . |
| 7a) +Zoom Button (optional) (and depending on the setting zoom level) | 7b) -Zoom Button (optional) | 7a,b) are only visible for a short time after touching the map | 8) Location Button (optional) |
| 12) Route | 12a) Route Direction (optional) | 13a,b,c,d) Waypoints | 14) Instruction point (optional) |
| 13a) Waypoint Start | 13b) Waypoint End | 13c) Waypoint Via point (optional) | 13d) Waypoint Shaping point (optional), without fig. |
| 20) Speed Panel (optional) | 21) Altitude Panel (optional) | 11) GPS Logging Panel (optional) (only Kurviger Pro) | . |
| For more info on the elements and their actions, see also in this and in the other topics of the guide, Links at the end of the page | |||
Show location in map, Switching on and off the Follow mode:
When map was moved, in all modes you can show map with location in the visible area (location must be enabled in device settings):
Location Button (Short)>
If you are in map mode, you can switch to follow mode by long touching the location button (8).
Location Button (Long)>
The button (8) is blue in follow mode.
If you are in follow mode, you can switch off follow mode by briefly touching the location button (8).
Location Button (Short)>
You are then back in map mode. The location button (8) will then be displayed in the usual neutral color.
Enable and disable map rotation in follow mode:
By touching the compass (3) you open a dialog to set the map orientation.
Compass>
In the dialog the following selections are available
- Manual (The map is displayed vertically in north-south direction by default. It can be rotated manually (see “Gestures” in the Links at the end of the page). If the map is rotated, it will be displayed again in vertical north-south direction when tapping the compass.
- GPS 2D .
- GPS 3D .
- Compass 2D .
- Compass 3D .
With “Manual”, the map on the screen is by default aligned vertically in a north-south direction. For the selections marked with “2D” and “3D” the map rotates on the screen so that the direction of travel is (almost) always directed to the top edge of the screen. Try out the setting that you like best or that works best with your device.
Use of Measuring mode
In the measuring mode a measuring line is displayed. With this you can measure the distance between two points.
The length (distance of the points, bee line) and orientation of the line is displayed in a panel at the top right. The orientation is displayed as an angle relative to the starting point (to the north 0° or 360°).
Switching on the measuring mode:
Menu button>Tools>Measure>
Measure by moving the measuring points:
- Touch start point (green) and / or end point (red) for a long time and move to the respective desired position.
- During and after moving the measurement points, the associated measurement values (distance, orientation) are displayed at the top right of the associated measurement results panel.
After measuring, the measuring mode can be switched off.
Switching off the measuring mode:
Menu button>Tools>Measure>
Take a screenshot of the screen
If you want to take a screenshot (recording of the screen) in the Kurviger App, this is usually quite easy. To capture the current screen, all you have to do is this:
Menu Button>Tools>Screenshot>
The screenshot is created and the Android storage access framework is opened.
There you can rename the file that is automatically given a timestamp (year, month, day, time) as file name if necessary and save it in a folder of your choice.
Not all image layers are captured in the screenshot. For example, the buttons and compass are not shown in the screenshot. If you want a screenshot with all image layers, you have to take a screenshot with the device's own screenshot function.
Problems occur when you want to make a screenshot of a message. Since messages are automatically hidden after a short time, this does not work with the Kurviger Tool. So you have to take a screenshot of a message with the device's own screenshot function.
Screenshots created with the device's own function are not stored with the Android storage access framework, but automatically in a device-specific folder.
Keep screen on
In the app there is an option to leave the screen on if necessary. You can reach this setting with:
Menu button>Settings>Application>Keep screen on>
A dialog opens, title Keep screen on:
- o Always (Screen always stays on when app is open)
- o Follow (In Kurviger (Free), screen stays on in Follow mode)
- o Navigation / Follow (In Kurviger Pro, screen stays on in Navigation or Follow mode.)
- o Off (Screen is turned off after a short time depending on device settings, can lead to app shutdown depending on device power management! See FAQ, link at the end of the page)
- CANCEL
Kurviger Pro: For voice guidance, the setting “Off” may be possible or desired. This can reduce power consumption. Observe the energy management of the device! (See FAQ.)
Help
From time to time there may be questions about the operation of Kurviger (Free) or Kurviger Pro. The app offers you a help.
Examples how to access the help: (Internet connection required)
Quick introduction to the App:
Menu Button>Help>Getting started>
Frequently Asked Questions:
Menu Button>Help>FAQ>
Access to the documentation:
Menu Button>Help>Documentation>
Access to the forum:
Menu Button>Help>Ask in forum>
No registration is required to read the Internet pages opened by the help.
Forum questions:
If you can't find the answer to your question in the documentation pages and the forum, you can describe your problem in the forum. To do so, you must register in the forum.
When writing in the forum please follow the forum guidelines. When asking polite and with description of the problem, the forum people will try to help solve the problem in a relatively short time.
Wait for answer and possible questions in the forum. The answerers of your question are happy about a “Like” (little hearts) and a feedback in the forum, if your question was answered successfully or the problem was solved.
Please ask questions about possible problems with Kurviger in the forum and do not send them to a Kurviger e-mail address!
Questions to the e-mail address will not be answered for organizational reasons. Please do not misunderstand this with rudeness, lack of helpfulness or ignorance.
For questions in the forum, it is very helpful for answering your question if you provide the following information:
For questions to the app on your device:
Please provide information about the version of the app, Android, and device. You can view this information in the app and transcribe:
Menu Button>Settings>About>INFO>
Insert the details of the info at your question in the forum.
For questions, if the route calculation does not work as expected:
Include a description of your problem and, if possible, a short link of the route when asking the question.
You can determine the short link for example as follows:
Menu Button>Share>Route>Notations>- In the opening window you will see the short link that starts with https:/ /kurv.gr/
- Mark the entire short link including https:/ /kurv.gr/ and copy or transcribe
- Close the window again
or (if forum visit is done with same device as app use):
Menu Button>Share>Route>Clipboard>- The short link that starts with https:/ /kurv.gr/ is available in the clipboard and can be transferred to the question by “Paste”.
Paste the (copied or transcribed) short link into your question in the forum without errors, pay attention to upper and lower case!
Android storage access framework
The Android Storage Access Framework (SAF) is a tool for importing (loading) and exporting (saving) files from the app. It can access app-independent folders on the device (internal and SD card) and files within them.
The Android storage access framework is opened from the app during the corresponding actions (e.g. import or export of route files). In the various topics of this operating guide, the opening of the framework is referred to in the respective actions.
ATTENTION: At some devices or Android versions there are problems with storage access to the SD card! Recommendation: To avoid such problems, do not save files on SD card, save them internally.
In the following some possibilities of the opened framework are described.
Rough overview. More detailed elaboration is still missing!
Views:
- Tile view
- List view
Folder selection:
- change view if necessary (see Views)
- internal folders selectable
- SD card folders selectable
- select desired folder
Import (load) a file:
- select desired folder (see Folder selection)
- tap desired file
- Framework is closed
- Action continues in Kurviger App with the selected file
Export (save) a file:
- Input field (possibly preassigned with file name) and SAVE button are displayed
- ATTENTION! When changing the file name in the input field DO NOT OVERWRITE THE FILE EXTENSION (e.g. .gpx, .kurviger, .pref). The file extension must be preserved!
- select desired folder (see Folder selection)
- Save file, 2 options (without, with overwrite)
- A: File will not be overwritten
- Change the file name in the input field, (if necessary,) confirm with SAVE.
- If the file exists in the folder, it will not be overwritten, but a file with the same name will be added, but a number will be added behind the file (the file format).
- Overwriting the existing file is thus not possible.
- B: File optionally can be overwritten
- Tap on the file in the folder (file name is transferred to the input field) and confirm with the SAVE button.
- If the file exists in the folder, a Overwrite? dialog is displayed. Confirm with CANCEL or OK.
- If confirmed with OK, the file will be overwritten.
- Framework is closed
- The work in the Kurviger app can be continued.
App Kurviger, upgrade
There is Kurviger (Free) as a free app and Kurviger Pro as a paid app.
You have installed the app Kurviger (Free). The Free version displays advertising and is missing some functions that are available in the Pro version (e.g. navigation, map coloring, offline maps and offline routing for operation without Internet connection). Kurver Pro is advertising-free.
How do I get from the free app to the paid app?
Add or replace App Kurviger (Free) with App Kurviger Pro
App Kurviger (Free) and App Kurviger Pro are different Apps. An upgrade from Free to Pro is therefore not possible directly. Nevertheless you can install and use the Pro version! You only have to consider the following:
From the Google Play Store, you can use your Google Account to download and install the paid app Kurviger Pro on your device (see “How to buy App Kurviger Pro”).
Then you will find the app Kurviger (Free) and the app Kurviger Pro on your device. If you no longer want the Free Version on your device, you can uninstall it.
With the same Google account you can install the app Kurviger Pro on other Android devices at no additional cost. To do so, open the Google Play Store with the corresponding device and Google account and install the app Kurviger Pro on the device.
How to buy App Kurviger Pro
If you want to use the Kurviger Pro app, you have to buy it.
Purchase, download and install the Kurviger Pro app directly from the Google Play Store with your Google account.
If you have more than one Google Account, you should remember which account you used to buy the Kurviger Pro app! Only with this account you will be able to install and use Kurviger Pro for free - e.g. on other devices!
Map, POIs, Bookmarks, Address, Coordinates
The map data contains not only the streets but also other information. For example, various POIs.
You can adapt the map to your needs in various ways. Depending on the app (FREE, PRO) e.g. map provider, map colouring, mountains, POIs from map, individually defined bookmarks.
Note:
For Kurviger Pro, the use of Kurviger offline maps is recommended. These are continuously updated and improved for Kurviger Pro.
They are only available in Kurviger Pro.
See “Additional topics of the operating guide:” Map, ...
Route planning, Routing, Route, Waypoints, Instructions, Transfer
At routing a route is created from the specification of waypoints and route options.
During routing (route calculation) the instructionpoints (instructions) are also determined.
Information displays in the form of pop-ups, lists and / or menus are available for the route, waypoints and instruction points.
Actions are possible for some information displays.
Route transfer. A route can be imported, loaded, opened, exported, saved (or whatever you want to call it) and / or shared with others.
See “Additional topics of the operating guide:” Route planning, ...
Kurviger Pro: Navigation, Simulation, GPS Logging, Auto Zoom, Display Locking, Rerouting
In the App Kurviger Pro there are the possibilities for navigation, simulation of navigation, GPS logging, Auto Zoom.
You can activate a screen lock for the app, e.g. to prevent false activations by raindrops when it rains.
When leaving the route during navigation, there is the possibility of automatic or manually started route recalculation (rerouting).
See “Additional topics of the operating guide:” Kurviger Pro: Navigation, ...
Note:
Offline maps are recommended as they are constantly updated and improved for Kurviger.
If the Internet connection is poor or non-existent, the offline route calculation with the corresponding offline routing data can be used for rerouting in Navi mode.
Offline map data and offline routing data differ! They are in separate files!
Navi mode, offline maps and offline routing files are only possible in Kurviger Pro.
Internet connection, SIM card, online, offline use
Use of the app with an Internet connection is called online use; use without an Internet connection is called offline use.
If you use a smartphone or tablet without a SIM card, you usually do not have an Internet connection while driving. However, there are ways to connect the device without a SIM card to the Internet using devices with SIM cards.
This description does not differentiate between devices with or without a SIM card, but rather whether the app is operated with or without an Internet connection.
It can happen that due to poor network in certain areas there is no Internet supply.
The app requires an Internet connection to plan a route with the Kurviger options. An internet connection is also required for address search, unlimited use of online maps, show mountains, import of route files for route calculation, and more.
The app is most convenient to use when an unlimited internet connection is available. You don't need to take any measures for offline use then. Therefore, Internet connection is recommended to get familiar with the app.
If the Internet connection fails, it is still possible under certain conditions to follow or navigate while driving. Previously shown online maps are usually still available in the app. Already opened routes can be used without route recalculation. Importing *.kurviger route files and using them is also possible without an Internet connection. Problems occur if the map data of the visited area is not available and/or a route recalculation is necessary. An overlay (e.g. track from a *.gpx or *.kurviger file) can be imported and displayed without an Internet connection.
With the App Kurviger Pro the above restriction also applies in offline mode. But this app offers additional options for offline use (see below).
Kurviger Pro: Offline use
Offline use is the operation without an Internet connection. If you are not connected to the Internet, some functions of the app may be missing or there may be problems that are not present with an Internet connection. For example, the following things will then no longer work or not work fully:
- Display of online maps
- Hillshading
- Online route calculation with the Kurviger Route Options
- Address lookup
For Offline use the app Kurviger Pro offers following possibilities:
- Display of offline maps, which have to be saved before in the device (internal or SD card) for the desired area and then opened in the app.
- Offline route calculation or offline route recalculation without using the Kurviger Route options (e.g. when deviating from the original route). To do this a Routing Service selectable in the settings can be used. See the descriptions in the “Additional topics of the operating guide”, which are linked at the end of the page.
Offline maps and Offline routing data are in different files! To be able to use both, you have to use for both for the desired area the corresponding files stored in the device, as described in “Additional topics of the operating guide”. See Links at the end of the page.
Thus, in Kurviger Pro the follow and navigation mode in offline use is possible nearly without restrictions.
Offline Address Lookup is not possible.
Procedure for using offline maps and offline routing data
See “Additional topics of the operating guide:” Kurviger Pro: Navigation, ..., Offline use
Thanks
This guide could only be written based on my own experience with the app, the instructions provided by the Kurviger developers boldtrn and devemux86, the changelog entries, and the contributions of some very helpful forum members.
Therefore thanks to
- @devemux86, who developed the apps Kurviger (Free) and Kurviger Pro for us and continues to develop them for our requirements.
- @boldtrn, who developed the Kurviger website for us and continues to develop it for our requirements.
- Forum participants who have asked questions about the operation of the apps.
- Forum participants who have provided and are providing solutions to the questions.
- Forum participants who reviewed the draft of this guidance and made suggestions for improvement.
- @boldtrn, who made this description possible through his advice in many conversations and discussions.
- https://www.leo.org/englisch-deutsch, that was and is very helpful for translations (e.g. of some terms in this guide).
- https://www.deepl.com/translator, that was and is very helpful for translations (e.g. of some passages in this guide).
Links
Next topic: App: Map, POIs, Bookmarks, Address, Coordinates
Terms and Definitions about Kurviger
Additional topics of the operating guide to the Kurviger Apps:
App: Map, POIs, Bookmarks, Address, Coordinates
App: Route planning, Routing, Route, Instructions, Overlays, Track, Transfer, Waypoints
Kurviger Pro: Navigation, Simulation, GPS Logging, Auto-Zoom, Screen Lock, Rerouting, More, Offline use
Quick access to further information:
FAQ
Getting Started
Gestures
Offline Maps
Offline Routing
Route files, Route transfer (Import, Export)
More information about Kurviger can be found by clicking the links in the sidebar.


