Creating a Roadbook using Kurviger
If you are planning to do a rally or just prefer the old paper-style way of navigating, having a roadbook is always a good idea.
Creating the Roadbook
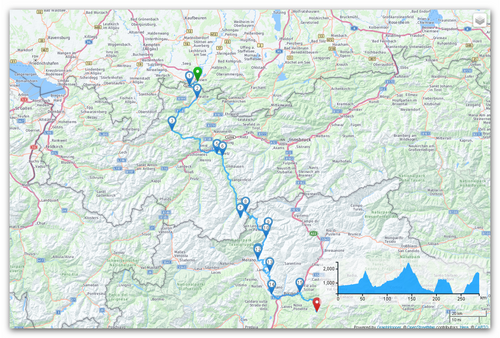
First of all, you need a route, if you don't have one, feel free to use this fantastic route.
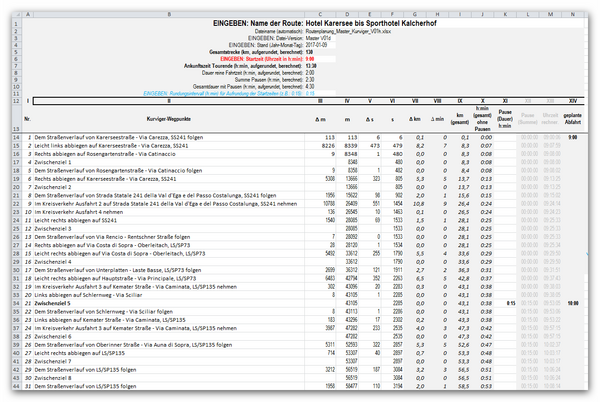
It works using Kurviger web or the Kurviger App. Click on the dropdown menu, right of the RouteName, then on Turn Instructions and then on Export Roadbook. Now you can simply copy the table. You can can export the turn instructions as CSV file as well. Our user Uli was so friendly to provide us a worksheet to import make it easy to either paste the copied roadbook or open the CSV. You can get the worksheet here (English version included).
You may:
- copy& paste the Kurviger export data (or open the CSV file) in the worksheet,
- decide when to start the route (time of day like 9:00 am),
- decide at which waypoint(s) to have breaks and how long every one will be,
- decide about the interval to which to round up the starting times after every break (at example 15 minutes, i.e. every time will be given rounded up to every 15 minutes).
The worksheet will tell you:
- some basic data like expected end of the route and some other (look at the header of the worksheet),
- the rounded up starting time after every break (which means, up to which time of the day everyone of the group or any latecomers have to arrive at this waypoint to join the group).
Usage Example
Uli provided us with an example where he used the worksheet to plan a trip, thanks Uli!
Why and how to use the computing MS Excel worksheet in combination with Kurviger?
Imagine the following situation:
You are planning a long day's route in a bigger group. Starting in South Germany near Füssen, crossing Austria and Italy by famous passes and ending near Bozen in South Tyrol (in the example at the Hotel Castel Latemar in the region of Bozen, well known to bikers)!
Problem is, that you know already, that the group will not ride … (in my case, with the roadster: drive, but this doesn't make any difference, so I go on calling it “ride”) … the whole route in a “corso” (parade, all members in a line): Different members of the group ride their own style and velocity, some prefer to ride hard, some prefer to have more stops for taking pictures (or for “liquid emission”) and so on. And additionally you know, that some Austrian friends will join the group after the coffee break, and some others will join the group after the lunch break, and so on. So you a Road Book, that not only gives the route, the waypoints and places of breaks, but also realistic (!) points in time, when all these latecomers will reliably catch the group. That's where the table comes into play.
(First it may sound complicated, but once or twice done, it's quite easy to apply! Of course being a bit familiar with Excel may help, but is not really necessary.)
- At first you plan the route by Kurviger of course by fixing waypoints as usual.
- On the route you decide which waypoints will be places to have common breaks and which will be meeting points for the latecomers until a certain point of time.
- You export this Kurviger route by the Kurviger export function as a CSV-file (Kurviger app) or by copy&paste (Kurviger browser version, by “Turn Instructions - Export Road Book”).
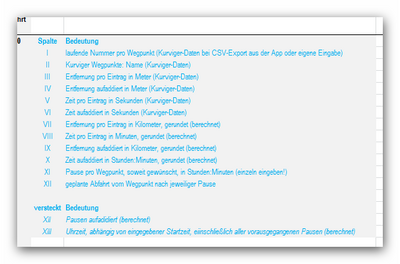
- You paste the CSV or the copied table into the provided Excel worksheet (best after right click by the Excel paste option “only Data - use format of destination” to avoid importing problems, e.g., the symbols), that means the 5 columns “II Beschreibung” to “ VI Gesamt-Zeit”. - The worksheet will now compute automatically the columns VII-X as follows: the distances into the usual unit Kilometers and the times into Hours:Minutes.
- Now you should decide at which day time you will start the trip, let's say 9 AM (enter this time in the red indicated field in the header of the worksheet.) - The worksheet will now calculate the time of day for every waypoint instead of relative times, shown in the column XI.
- Next you have to decide, how long the planned breaks will be, for example 0:30 Hours:Minutes for 2-3 coffee breaks during the trip and 1:30 Hours:Minutes for the lunch break, and insert every time periods for every planned break into the (red) column “XII Pausen” into the matching rows, for example waypoints 5, 10, 12 (you may vary the length of the breaks with a look to the calculated total duration resp. the arrival time of the planned trip in the header of the worksheet, see below!) - The worksheet will now calculate the day time for every waypoint depending from the starting time and all breaks before (columns XIII and XIV, which are usually hidden, because they are only calculating columns.)
- The curvy route times are based on a certain speed driving behaviour, which is on average about 90 km/h (but of course depends on the chosen routes, e.g. number of speed restrictions or city crossings). If you know in advance that you are probably travelling slower (or faster), e.g. for classic car or bike tours, you can enter a correction factor (1st orange field); e.g. 3 for a tour speed of approx. 30 km/h. (Please note: These can only be rough approximations).
- Because you usually round up the times for meeting time points, you may enter the interval for up rounding in the header (2nd orange field), if you want to change the value preset to 0:15 hours, every value is possible.
- You MAY insert additional values in the fields “Name of the route”, “file name”, “Version” and “Date of version, but they are not necessary for the computed parts of the worksheet, although they may be helpful to keep the overview about several routes or versions or to archive them.
NOW you finally find some main information in the header:
- the total distance (in km, rounded up),
- the arrival time (in Hour:Minute, rounded up),
- the pure riding (driving) time,
- the sum of planned breaks,
- the total duration of the planned trip,
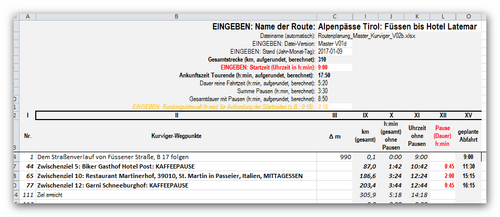
- the intended additional information about the planned starting time of every meeting point in column XV!.
NOW you may:
- take the whole worksheet, or
- hide the rows and/or columns, which you don't need for the road book (in fact you only need the header and the columns II and XV in those rows of the waypoints which are intended as break and meeting points, see example in the screen shot, and
- print it, or
- export it as a PDF file
- send it, together with the Kurviger GPX file, to all members of the group.
With this combined information, all members of the group have a chance to find the group at fixed times and places (indeed provided that you all stay patient and wait at every meeting point until the departure time provided in the list!! :) )
Additional Information: Sometimes you want to provide the members of the group with more information, so they can see the distance and needed time from one waypoint to the next and at which time they should pass a waypoint at least to meet the group again in time at the end of the next planned break.
Of course the worksheet contains all that information; it's only a question which rows and columns you hide or show. (Hiding or showing of rows and/or columns in excel is quite easy, if you know how to do.)
By the way: The route showed as an example here we, i.e. a group of 8 Barchetta roadsters, drove last weekend - which for me was a test of Kurviger V. 1.1.3 also - and it worked very well! :) And it was a very nice trip!!


