First steps with the Kurviger app
Thank you for choosing the Kurviger app! We hope you enjoy it as much as we do. Here's a little guide to help you get started using the Kurviger app. If you have any questions, take a look at our Frequently Asked Questions (FAQ) or ask in our Forum. The Kurviger App is available on Google Play.
How to find your way around the app
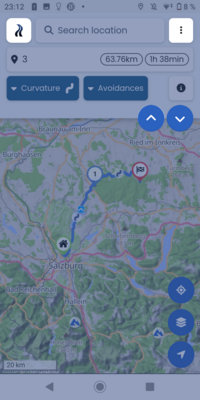
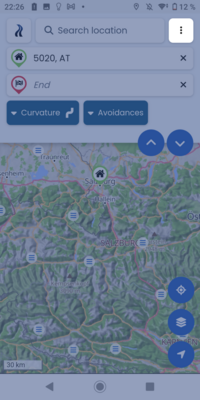
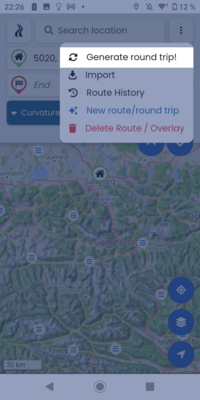
The most important actions that are relevant for planning your route can be found in the ⁝ menu at the top right. Here, for example, you can reverse, save or delete a route. But you can also generate a round trip or export a route, for example.
You can expand the route planning view from the top half of the screen to the whole screen to see more details about your route by clicking on the blue arrow buttons.
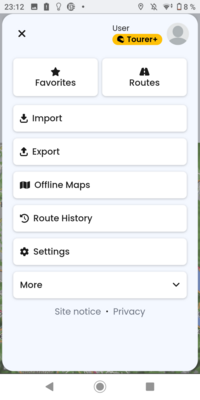
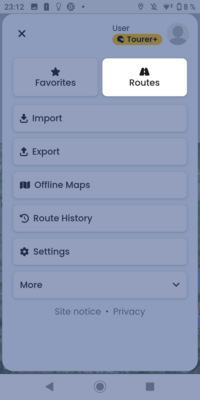
If you click on the Kurviger logo at the top left, a menu opens with all relevant options, such as Import, Export or the Kurviger Cloud.

Planning your first route
Place waypoint
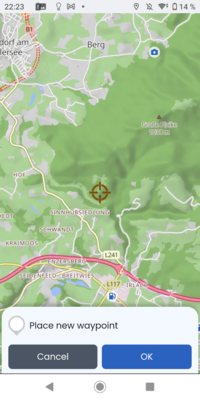
You can place a waypoint (start/finish/intermediate destination, such as a POI) in various ways:
- You can use the address fields
StartandEndin the upper half of the screen - You can short or long press on the map at the point where you want to place a waypoint
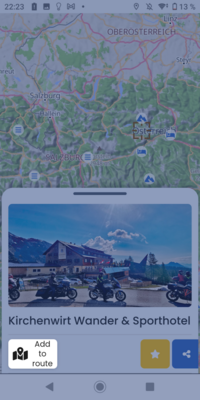
- You can click on the POIs displayed on the map and add them to your route as waypoints using the
Add to routebutton - You can use the
search barabove the address fields to search for a specific location or coordinates and add them to the route
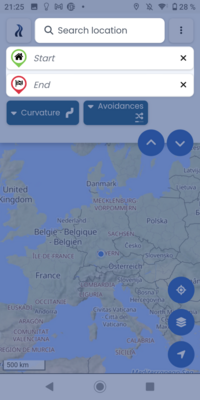
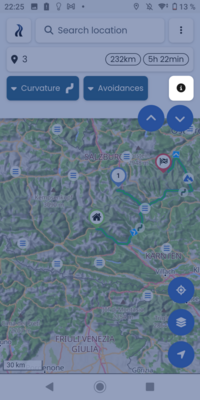
Set curvature
You can set the curvature of your route using the Curvature button below the address fields. To do this, simply select the desired curvature. You can find more information about the curves here.
Set avoidances
You can define the avoidances of your route using the Avoidances button below the address fields. To do this, simply select the desired avoidances. To set the strength of the avoidances individually, you can click on the number and then adjust the avoidance strength using the slider. You can find more information about the avoidances here.
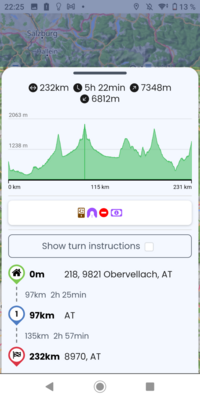
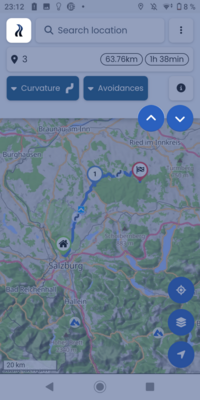
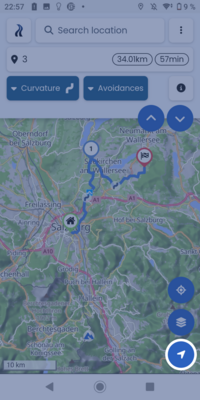
Show route information
Kurviger offers you the option of displaying further route information for your planned route. This information includes the distance, journey time and altitude metres. You can also use the altitude diagram to analyse your route and keep track of closed roads or toll booths, for example.
To access this information, click on the i button below the address fields. A widget will then open, which you can slide up to display all relevant information and also the turn-by-turn directions.
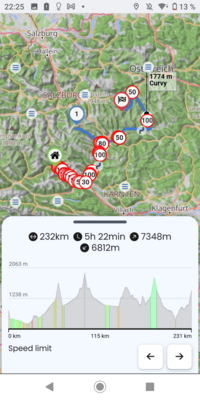
Tip: By clicking on the altitude diagram, you can switch between different information (altitude, route information, speed limit, route profile for sections) using the arrows that appear.
![]()
![]()
Show more information (route information, speed limit, route profile for sections)
- With Kurviger Tourer and Tourer+, you can switch between different information (altitude, route information, speed limit, route profile for sections) by clicking on the altitude diagram with the
arrowsbuttons that then appear.
Plan a round trip
Set a starting point for your circular tour (see Place waypoint) or open the ⁝ menu directly. To do this, click on the ⁝ button next to the search bar.
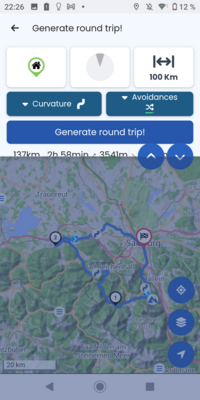
Now set a starting point or click on Generate round trip. Define all settings (compass direction, distance, curves and avoidances) according to your wishes and click on Generate round trip. Your round trip has now been generated! Don't like the round trip? By repeatedly clicking on the Generate round trip button, you can always have new round trips suggested to you.
Manage routes and access routes
Save route in the cloud
To save your route, you must open the ⁝ menu. To do this, click on the ⁝ button next to the search bar.
You now have various options to choose from, including Save route. Click on the Save route button, specify the route name and the storage location and click on the Save route button to save your route.
Export route
To export your route, you must open the ⁝ menu. To do this, click on the ⁝ button next to the search bar.
You now have various selection options, including Export route. Click on the Export button, define all the export settings relevant to you and click on the Export button to export your route.
Load route from cloud
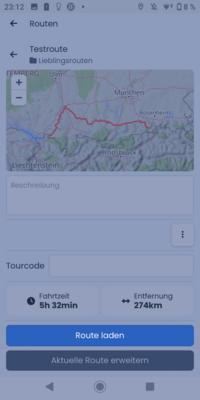
To load a route from the Kurviger Cloud, click on the Kurviger icon in the top left corner. You are now in the main menu. Now click on Route to go to your saved routes. Now you can select a route and load it into the Kurviger app by clicking on the Load route button.
Import route
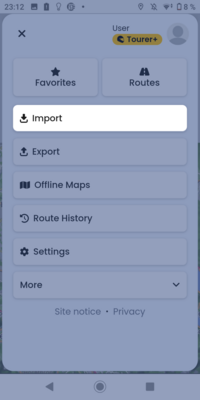
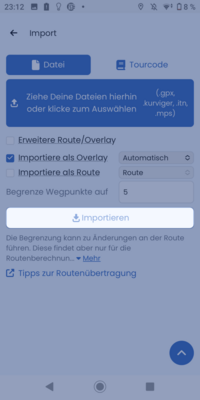
To export your route, click on the Kurviger icon in the top left-hand corner. You are now in the main menu. Now click on Import to import a route. Now you can upload your file (e.g. .gpx, .kurviger, .itn, .mps), make settings (limit waypoints, import as overlay or route, etc.) and import it into the Kurviger app by clicking on the Import button.
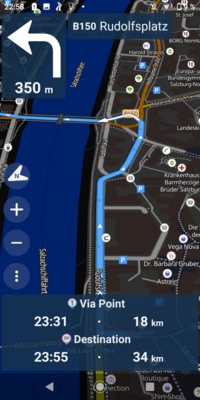
Drive your first route - start navigation
Ok, that's the tedious part, let's drive the planned route and enjoy the ride! There's not much to do.
Click on the Start Navigation button in the bottom right corner of the interface and select the starting point of your route (if your current position is not on the route). Now click on Start navigation and enjoy your winding tour!
If you have headphones or an audio system and want to use it with Kurviger, that's no problem, just connect it to your smartphone (Bluetooth or plug). If you don't have a holder for your smartphone or would like to save your battery, you can switch off your display during navigation and the announcements will continue as normal.
If you want to receive navigation updates while navigation is running in the background or the screen is locked, you must select “Always allow” in the authorisation screen. You can exit this screen using the back arrow at the top left.
![]()
voice-guided navigation
- Note that you need a Tourer+ subscription for voice-guided navigation. Kurviger Tourer+ contains all the functions of Kurviger Tourer and also offers you motorbike navigation functions. This gives you voice-guided navigation and offline maps.
Screen display (portrait/landscape) in the navigation
You can switch between portrait (portrait) and landscape (landscape) screen display in the navigation. Please follow the instructions below to switch between portrait and landscape mode:
Start navigation → Rotate smartphone (Rotate device to the desired orientation → Fix button (Temporary blue button appears automatically on the screen) → Fix display (Click on the blue button to fix the current orientation of the display)

Further questions?
Do you have more questions about Kurviger? Then click through our documentation. You'll find a few helpful links below. Otherwise, you can also see the most important topics in the sidebar. You can also visit our YouTube channel. There you will find some helpful videos from the “Kurviger Explained” series.
You can also contact us at any time in the Kurviger Forum. We will help you with your enquiry as quickly as possible.