This is an old revision of the document!
Terms and Definitions about Kurviger
Why this page? It's all clear! So some might say, who has experience with route creation and / or navigation devices.
But unfortunately, many terms are not used in the same way by the various equipment manufacturers. In addition, different travel publications use different terms for specific situations. Example: the difference between routing and navigation is often not clearly distinguished.
This page was created to help you understand Kurviger. It should help to avoid misunderstandings when reading the documentation and using Kurviger. Also, consistent use of terms can make communication in the Forum easier.
Operating instructions are largely not included!
Note: The pictures are from both the website and the app. Much is similar on the website and in the app. That's why there are no separate pictures here as far as possible. In addition, over time, revising the app or website may lead to differences between the images in the documentation and their appearance on the screens. However, the text should still be valid. If you find any discrepancies between the text and the behaviour of the website or app, please let us know in the forum.
Sometimes pictures are very small. To enlarge a picture you can click on it.
 means: The pictures or info refers to the old app. For the new app modifications may be needed.
Links to more info see at the end of the page.
And now enjoy reading.
Views and Modes of the Website and Apps:
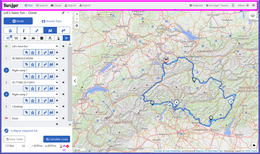
| Map area (App, Web) |
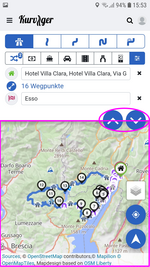 |  |
| The map area is an essential element for route planning as well as for driving operations (e.g. navigation). |
| Depending on the application (e.g. planning, navigation) more or less actions are possible in the map area by clicking or tapping. |
| Depending on the application, additional control buttons and / or info panels are displayed in the map area. |
| Depending on the application, the display of the map area may be affected by a sidebar (see below). |
| Picture left: App, sidebar half open Picture above: Web (PC), sidebar shown |
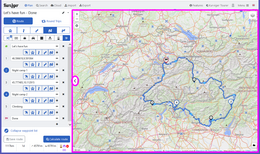
| Sidebar (App, Web) |
 | 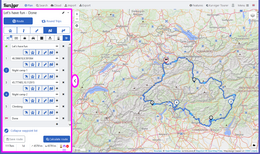 |
| The sidebar is an essential element for input, management and info display in e.g. planning, import, export, cloud, search. |
| The sidebar can be hidden / shown to display more or less of the input / info area or the map area as needed. |
| Depending on the app / web, device and portrait or landscape format, the sidebar is displayed / hidden differently. For website and PC e.g. sideways, for app and mobile in portrait format e.g. from top to bottom, completely or partially. |
| Picture left: App, sidebar half open Picture above: Web (PC), sidebar shown |
| Widget (App, Web) |
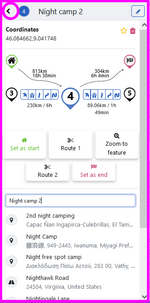 | Widgets are essential elements in the sidebar to make special inputs, trigger functions and / or display information. |
| A feature of widgets is the back arrow in the widget's title bar. The back arrow can be used to close the widget and return to the previous sidebar view. |
| Picture left: Widget, e.g. waypoint info and input on the web |
| . |
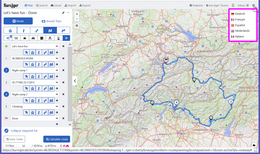
| Main menu (App, Web) |
 |  |
| A main menu is an essential element to start certain actions. |
| Usually, main menus are closed after an action has been selected. However, it can also be closed without selecting an action by clicking / tapping a possibly existing X symbol in the main menu or by clicking / tapping outside the main menu. |
| A special form of a main menu is the menu bar, e.g. on the web page and PC. This is usually not closed after the selection of an action. The selected action is marked in the menu bar. |
| Picture left: App, Main menu Picture above: Web (PC), Menu bar |
| Menu, Context menu (App, Web) |
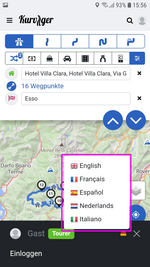 |  |
| A menu is an essential element to start certain actions. Depending on the call or task of a menu, the menu may also be called a context menu. |
| Menus are usually closed after an action has been selected. However, it can also be closed without selecting an action by clicking / tapping a possibly existing X symbol in the menu or by clicking / tapping outside the menu. Some menus of the app can be hidden / shown by swiping. |
| Picture left: App, Menu for language selection Picture above: Web (PC), Menu for language selection |
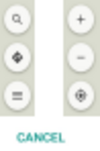
| Dialog (App, Web) |
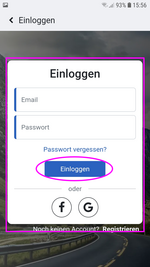 | 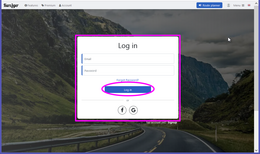 |
| A dialog is an essential element to start certain actions, make inputs or / and display certain information. A dialog contains e.g. an OK button and / or CANCEL button or a button for a certain action. |
| Usually dialogs are closed after clicking / tapping e.g. the OK or CANCEL button. However, a dialog can possibly also be closed by clicking / tapping outside the dialog or with the back button of the browser or device, changes in the dialog are not taken into account. |
| Picture left: App, Log in Picture above: Web (PC), Log in |
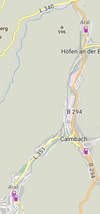
| Map View, Map Mode, Route Planning Mode (App, Web) |
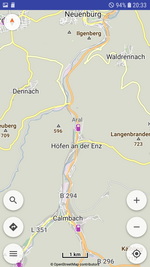 | The Map-Mode is the basis for the other modes. If map data is missing for areas, these areas are displayed in neutral color (without streets, cities, …). |
| You can move the map manually. |
| If a route is available and/or the location is known, it will also be displayed when it is in the visible area. |
| Picture shows previous app |
| . |
| Follow view, Follow mode (App) |
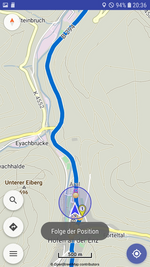 | In Follow-Mode the map follows the actual position of location. |
| The app will automatically move the visible map section to match the position. If map data is missing for areas, these areas are displayed in neutral color (without streets, cities, …). |
| For this the location must be known. A planned route is not required. |
| No turn instructions are displayed! |
| Picture shows previous app |
| . |
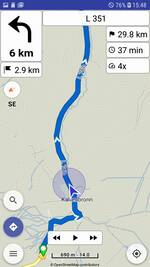
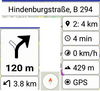
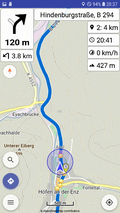
| Navigation view, Navi view, Navi mode (App, needs respective subscription) |
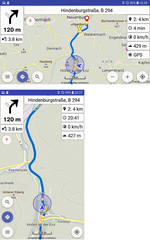 | In Navi-Mode the map always follows the actual position of location. Turn-by-turn directions are displayed and due to setting voice guidance is provided. |
| The zoom level may be adjusted automatically depending on the setting. If map data is missing for areas, these areas are displayed in neutral color (without streets, cities, …). |
| The location must be known and a route must be available. |
| When leaving the route due to setting the route can be recalculated automatically or manually. Off the route there are no turn instructions. When you return to the route at a later point (without rerouting) or after rerouting, navigation with turn instructions continues automatically. |
| Picture shows previous app |
| Navigation Simulation, Navi Simulation (App, needs respective subscription) |
 | In this mode navigation is simulated for an existing route, the app behaves like a real navigation, see also navigation view. |
| Currently only in previous app: The simulation speed can be set much faster than during normal driving. It is also possible to jump back and forth during the simulation. |
| Picture shows previous app |
| . |
| Light Mode, Dark Mode (App) |
 | The light or dark mode influences the appearance of the displays and menu or dialog views. Switching the light or dark mode on/off is described in the operating instructions of the app. Currently, the change of the light or dark mode is only effective after restarting the app. |
| Picture shows previous app |
| . |
| Map Color (App, needs respective subscription) |
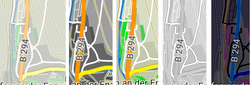 | For the map there are different colors with different contrast. Depending on the light conditions (day, sunny, cloudy, …, night), the visibility and usability of the app can be improved by selecting the appropriate map coloring and light or dark mode. |
| Picture shows previous app |
| Crosshair Mode (App) |
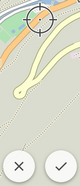 | In crosshair mode, when positioning on the map (e.g. positioning or moving waypoints) a crosshair and a cancel and confirm symbol is displayed. While these symbols are displayed, the map can be zoomed and moved under the crosshair. This allows precise positioning. By pressing the confirm symbol the displayed position is accepted, by pressing the cancel symbol the positioning is aborted. Crosshair mode is possible in Map mode, follow mode and Navi mode. |
| Picture shows previous app |
| . |
| Auto Zoom Mode (App, needs respective subscription) |
| In auto zoom mode, the map zoom in navi mode is automatically adjusted according to route, location and/or speed. |
| |
| GPS Recording Mode (App, needs respective subscription) |
 | In GPS mode, the GPS panel is displayed. In the panel is the recording symbol and GPS or a number. With this panel you can start and stop the recording of GPS data as Track and save and delete the recorded Track. More about Track and Track recording below. |
| Picture shows previous app |
General Elements and Actions
| Map (App, Web) |
 | The map mostly shows streets and cities and, depending on the setting, other places such as gas stations. The data of the maps used in Kurviger are mostly based on the OpenStreetMap map data, partly also on map data from other sources. |
| Online-Maps: Online maps are available worldwide and require an Internet connection. |
| Offline-Maps (only App, needs respective subscription): Offline maps are available in Kurviger worldwide. They must first be downloaded from Kurviger with an Internet connection for each desired region and stored in the device (internal or SD card). Maps for these regions can then be displayed without an Internet connection. |
| More see below Online, Offline (…) |
| Information for app refers to previous app |
| Location, current Position (App, Web) |
 | The location (or the current position) is determined by a sensor of the device using latitude and longitude data. In order to use this data for Kurviger, it must be enabled in the device. If the location in the app is outside the viewing area, the position of the location is indicated in the direction of the location at the edge of the map. |
| Picture shows previous app |
| POI, Maplayers (App, Web) |
| These points are integrated in the map data. |
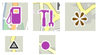 | POI (Points of Interest) can be displayed depending on the setting. Kurviger currently offers a number of POIs for selection (e.g. petrol stations, passes, …). They can be selected and displayed as map layers. The POIs are displayed with certain icons. Displaying information about the POI by touching the POI depends on the data, it is not always possible. In Kurviger, you can set a waypoint at a POI for route calculation (start, waypoint, destination). A POI itself is not a waypoint for route calculation. You can also propose a new POI. |
| Picture shows previous app |
| Bookmarks, Favorites, Places (App, Web) |
| These points can be defined individual or can be created by 3rd party suppliers (e.g. Passknacker). |
 | It is possible to create and display user-defined location markers (bookmarks). A bookmark is similar to a POI, but bookmarks can be defined individually and even to be loaded from external sources. Bookmarks are displayed with an icon on the map. |
 |
| For bookmarks and favorites some things are in development. Some additions or changes are possible. Nevertheless we give you the description above for general info. |
| |
| Buttons (App) |
 | Touching a button opens menus or dialogues or enables certain Actions to be performed. Some Buttons are not displayed permanently but depending on the situations or settings. Buttons may have different shapes and look different. |
| Picture shows previous app |
| . |
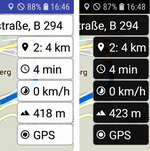
| Panels, Displays (App) |
 | Panels (display areas) are available in Kurviger, for example, in the navigation. Depending on the setting or situation, some panels are shown or hidden. With some panels, an action is executed by a short or long tap. |
| Picture shows previous app |
| Notifications (App) |
 | Text messages are shown for a short time (approx. 5 to 10 seconds) to inform the user. |
| Picture shows previous app |
| Popup (App, Web) |
 | The popup contains information about a specific element. It is displayed, for example, when an element is briefly tapped. You can hide the popup again by tapping it again. Pop-ups are available for many map elements, such as bookmarks, turn-off points or waypoints. |
| Picture shows previous app |
| Tooltip (Web) |
| If you move the cursor over a control element with the mouse, a note is displayed for the corresponding element at the position of the cursor. |
| |
| Info bubble (App) |
| If you tap some elements (e.g. waypoints, bookmarks, instruction points), a info is displayed in a bubble (see above at Popup). |
| |
| Route (App, Web) |
 | A route is a stretch of road that connects waypoints.. |
| In Kurviger you may plan a route. |
| In Kurviger you may import (load) a route in different formats. |
| In Kurviger you may export (save) a route in different formats. |
| Picture shows previous app |
| Symbols and declaration of Waypoints, Start, Via Point, Shaping Point, End (Destination) (App, Web) |
| Prev. App | Web, App | Road-book | Waypoint is the main term for points required to calculate a route. Sometimes WP is used as an abbreviation (e.g. in the forum). Currently there are the following waypoints: |
 |  |  | Start, beginning of the route |
| Depending on selected language for website and / or app the term of this point may be replaced by a translated term. (E.g. in german: Start; in french: Départ) |
 |  |  | Via Point, Point on (or at) the route where for example a stopover or Special view is planned |
| Displayed in waypoint list. May be filtered in turn instruction list. Displayed or optionally announced in navigation. |
| Sometimes VP is used as an abbreviation (e.g. in the forum). Depending on selected language for website and / or app the term of this point may be replaced by a translated term. (E.g. in german: Zwischenziel; in french: Point intermédiaire). |
 |  |  | Shaping Point, Point for route guidance over a specific route section, unintrusive marking |
| Displayed in waypoint list. May be filtered in turn instruction list. Not displayed or optionally announced in navigation. |
| Sometimes SP is used as an abbreviation (e.g. in the forum). Depending on selected language only in old app the term of this point may be replaced by a translated term. (E.g. in german: Formpunkt; in french: Point de forme). |
 |  |  | End (Destination), Point of end of the route |
| Depending on selected language for website and / or app the term of this point may be replaced by a translated term. (E.g. in german: Ziel; in french: Arrivée) |
| The Via Points and Shaping Points are marked as waypoints with consecutive numbering (starting with 1). Start and destination are marked as such and are not numbered. |
| To avoid problems with route calculation and navigation, do not place the waypoints on crossways, circular traffics or junctions! |
| The waypoints do not have to be positioned on the road. They may well be positioned on buildings or placas, for example, to mark meeting points. However this can lead to problems with turn instructions and export! |
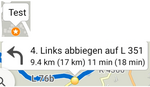
| Instruction points, Instructions, Turning points, Turn-by-turn instructions, Turn instructions (App, Web) |
 | Instruction points, Turning points can be displayed with the route depending on the settings. They are displayed as points on the route. These points are created by routing software and manually not moveable. |
 | In Navigation, turn-by-turn instructions and Instructions are displayed with icons and distance information for the turn points and waypoints. Depending on the setting, the instructions are also output by voice message during navigation. |
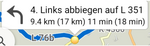 | Turn instruction is displayed as popup when touching a turning point. |
| Picture shows previous app |
| Potentially Closed Roads, Restrictions (Web, App, needs Tourer subscription) |
  | Symbols for time or vehicle dependent restrictions (e.g. road block at construction sites, weekend driving restrictions) are displayed depending on the setting. The restriction symbol is displayed on the corresponding route section and the route section is highlighted in red. Click on the symbol to display further details on the blockage. |
| |
Routing, Route Calculation, Rerouting and Navigation, Off Route
| Routing (route calculation) (App; Web), Rerouting (only App, needs respective subscription) |
| | Routing (route calculation) is the procedure to create a route from the given waypoints and route Options. |
| Rerouting is the procedure in Navigation to create a new route when leaving the route from the Location to a Point on the previous route specified in the Settings (see also Off route). From the Point specified in the Settings the previous route is taken into account. Automatic rerouting can be switched on and off in the Settings. |
| More see below Online, Offline (…) |
| Picture shows previous app |
| Navigation (App, needs respective subscription) |
 | Navigation corresponds to guidance along a route. Navigation requires a route and the current location. If navigation is activated, the route will provide the corresponding turn instructions at the turn points and information on the remaining distance and time to the destination (in Kurviger format even without an internet connection). When exiting the displayed route, the corresponding panel remain on the navigation view. However, no values or turn-by-turn instructions are shown on the panel. In addition, the away from route sign is also displayed. When you return to the planned route at a later point, the navigation will continue as usual. |
| Picture shows previous app |
| Off route, Away from Route (App, needs respective subscription) |
 | The symbol is only displayed in the navigation view if the location is away from the planned route and normally only occurs if automatic recalculation is disabled. The arrow in the panel on the top-left points in the direction of the planned route (depending on the selected recalculation mode). You can manually start a route recalculation by touching the icon. |
| Picture shows previous app |
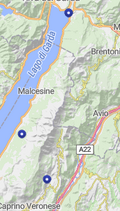
| Track (App, Web) |
 | A track is a collection of latitude and longitude data from successive points at relatively short intervals along a traveled or calculated route. The track does not include any waypoints or turnpoints. A track can be imagined as a digital track, similar to a track that is actually created when, for example, a vehicle loses sand at more or less regular intervals, which remains on the road and forms a lane. |
| Tracks can be used both as overlay and for route calculation. |
| Picture shows website |
| GPS Logging, Tracking (App, needs respective subscription) |
| | Recording of the travelled path. Touching the GPS panel switches the recording on and off. |
Depending on the setting, the app records the corresponding latitude and longitude data (and possibly other data) at shorter or longer distance and time intervals using the GPS data. The recording can be saved as *.gpx file in the device. |
| Picture shows previous app |
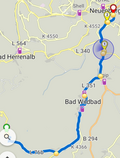
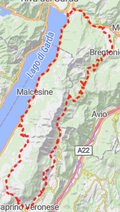
| Overlay (App, Web) |
Various data can be displayed in Kurviger on the map as an overlay, for example Waypoint, Track, and Route. The desired data must be available in the *.gpx file. The data loaded as an overlay is only for visual display on the map. If the data should also be used for route calculation, this must be specified when loading the file. |
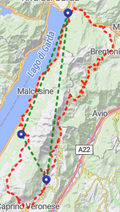 | Depending on the source, Waypoint, Track or Route can be loaded individually or as a combination, as an overlay. In the picture both the track, the waypoints and the route were imported as overlay. |
| | Track imported as overlay. Tracks loaded as an overlay are displayed as tracks along a route. In the picture red dotted track on roads. |
 | Waypoints imported as overlay. Waypoints loaded as overlay are displayed as dots. Blue dots in the image. |
 | Route imported as overlay. Routes loaded as overlay are displayed as straight line between the originally planned points (without showing the points). In the picture the green dotted line. |
| Pictures show website |
| By pressing certain keys you can partially influence the display and operation of the web page. |
| R | Hide route |
| W | Hide waypoints (start + via points + shaping points + end) |
| S | Hide shaping points (only shaping points) |
| ALT + S | Snapping waypoints to the street |
| ESC | Closing a context based widget (e.g. Waypoint widget, POis widget) |
| ENTER | Accept / save the input in an input field |
| Data in online and offline operation |
| Data are required for map display and route calculation. The data used in Kurviger are largely based on data from OpenStreetMap.org. Some map data are also based on data from other sources. Between updating the original data e.g. in OpenStreetMap and using it in Kurviger, some intermediate steps are necessary. This leads to a time gap between changing the original data and availability in Kurviger. For information on the time gap, see below for online and offline operation. When using the data, Kurviger must comply with various licenses and directives. |
| |
| Online operation (App, Web) |
| Online operation is the Operation of Website and app with an existing Internet Connection. Maps and route calculation work without further actions. |
| Data changes become effective in Kurviger after few days in the online route calculation, in the map display it can take longer. |
| |
| Offline operation (App) |
| Offline operation is the Operation without Internet connecction. This is only possible with the app. Not all functions are available in offline mode. For example the address search is missing. Special Actions are required for other functions: |
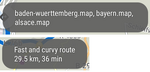
| To Display maps offline maps for the desired area must be saved in the device and opened in the app! Only possible in App with respective subscription! |
| For offline routing (route calculation) offline Routing data of the corresponding Provider and the desired area must be saved in the device and opened in the app! Only possible in App with respective subscription! |
| Data changes become effective in Kurviger after about 1 to 2 weeks in the offline route calculation and after about 1 to 2 months in the offline map display. |
| Information for app refers to previous app |


